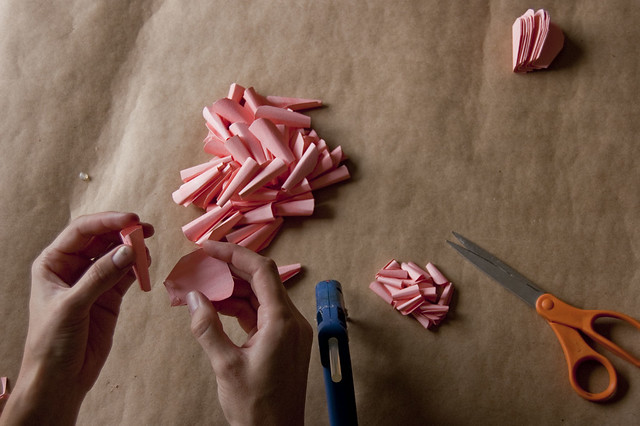
Showing posts with label tutorials. Show all posts

Wednesday, March 8, 2017

Sugar cubes infused with angostura bitters and orange (aka the instant old fashioned)

I've been contemplating this project for over a year and I finally got around to it over the holidays (and then made a couple more batches for quality control before writing this post). An old fashioned is one of my favorite cocktails, when it's done well (FYI - my current favorite in LA is from Melrose Umbrella Company). In the simplest form it consists of just bourbon, bitters and sugar, although personally I like a strong note of orange in mine so I always add that in.

At home I've played around with various methods and my best version involves an orange infused simple syrup, but that only lasts for a few weeks in the fridge and there are times where I don't feel like pulling out a saucepan just to make a cocktail.

Also, sugar cubes are cute and easily portable (read: camping, flights).
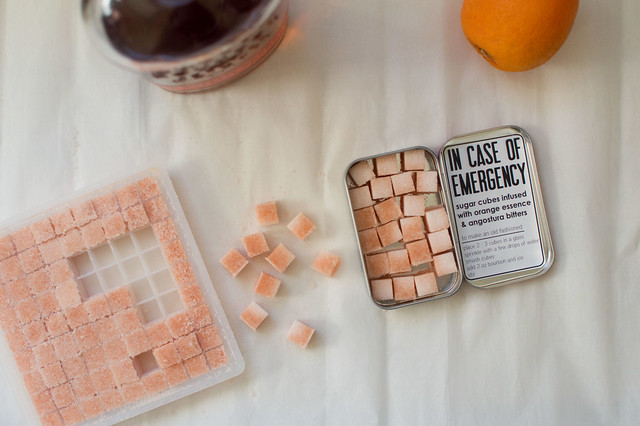
sugar cubes with orange and bitters

I looked pretty extensively online and found a couple of different methods for making your own sugar cubes, but I wanted a way to incorporate that orange flavor that I love. I was originally thinking about buying some orange essence oil and then it suddenly occurred to me that, duh, I am surrounded by fresh oranges this time of year and I should just go straight to the source. So the process starts with making a variation on an oleo saccharum, which is just a fancy way of saying that you're pulling all the delicious oil out of citrus peels. A traditional oleo saccharum has a very high peel to sugar ratio and you basically end up with liquid. I didn't want to go quite that far, so I upped the sugar ratio. After letting the sugar and citrus sit for 24 hours I pull out the peels and add in bitters to taste. The amount of bitters you need will vary widely depending on how sweet your oranges were, so you do have to taste. The first batch I made using oranges from my favorite farmer's market vendor, but they weren't super sweet and I ended up needing very little bitters at the end. The next two batches I made using navel oranges from my parents' tree and those were so sweet that I needed double the amount of bitters. Sorry - I know it's nicer if a recipe can tell you exactly how much of everything to add, but fruit just varies too much. I recommend tasting tiny bites of the sugar mixture as you add in the bitters, and when you think you have it perfect you should mix up a quick old fashioned using the sugar. If it's too bitter, add in a bit more sugar. If it's not bitter enough, keep going. Warning - make scaled down cocktails for tasting and keep in mind that unless your alcohol tolerance is sky high, you won't be able to fine tune it much at this point.
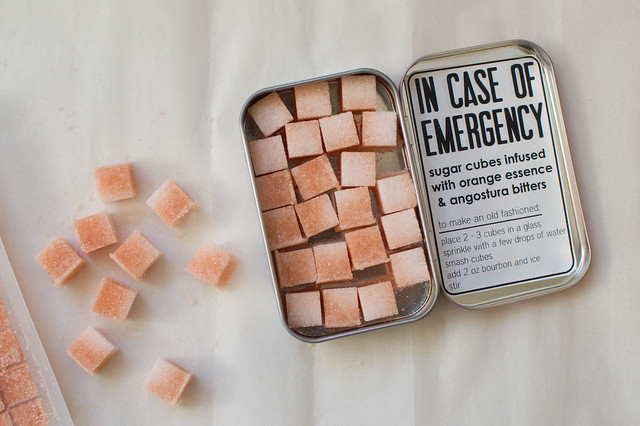
sugar cubes with orange and bitters

I wanted to be able to package them for friends, so I designed a label that would fit inside an Altoids tin because we had those lying around. I washed the tins multiple times with soap so that the peppermint scent was completely gone. If you want to do the same, the printable PDF with the labels is right here (pretty sure this goes without saying, but personal use only, please!). If you don't have a crazy Altoid addiction like us, these blank tins look to be the right size.
Sugar cubes infused with angostura bitters and orange (makes two trays full of tightly packed cubes, plus a bit left over) I use these trays and I love them - each tray makes 81 cubes, so you get 162 cubes per batch, enough for 50 - 80 drinks 
2 cups superfine sugar (I just quickly blitz regular sugar in my food processor)
4 oranges, peeled (you are just using the peels)
Angostura bitters, to taste (somewhere in the range of 15 - 30 dashes) 
Combine the orange peels with the sugar in a non-reactive bowl (glass or enamel, NOT metal) and allow to sit for about 24 hours.  
The next day the sugar should be fairly damp. Pull out the orange peels (it is really tempting to snack on them as you do this, but WAIT - if you snack on orange peels you will totally blow out your taste buds and make the next step harder).  
Start adding bitters. I'd start with 10 dashes, take a tiny taste and see if the flavor is coming through. You're also getting bitter flavor from the orange peels themselves, so a lot depends on your fruit. For early season farmer's market oranges, I used 12 dashes of bitters. For peak season homegrown oranges I needed 25 dashes. If you overshoot, you can add a bit more sugar. 
Once the sugar is adjusted to your taste you start pressing it into the trays. I work on a large sheet of parchment paper and just dump sugar all over the tray, press it in using a wedge shaped offset spatula, and then scoop up the extra that spilled on the parchment and pack that on top. I want these cubes to be as perfectly shaped as possible, so after I fill the whole tray I go back and use the base of a chopstick to tamp each cube down, then add a bit more sugar, then tamp it down again. It's a little fussy, but the whole process still doesn't take more than 15 minutes. 
Allow to dry thoroughly. We had a damp winter, so I actually left the trays in my oven for a couple days so that the pilot light could help speed up the drying process. If you do this I'd recommend putting a huge note on the front of the oven door to remind yourself to pull the trays out before turning on the oven. Speaking from personal experience here. 
Once they're fully dry you just pop them out of the trays and package them up. Store them in a dry, dark place, since they'll lose color more quickly if exposed to light. 
You can use them in an old fashioned (instructions on the printable labels) or just drop one in the bottom of a champagne flute for a quick and pretty cocktail.

You could easily play with this method and make different flavor combinations. I'm thinking of doing a grapefruit and rosemary version for summer cocktails but the possibilities are endless, really.
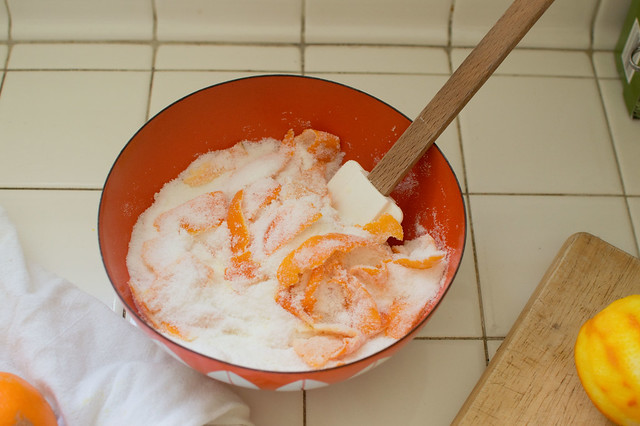

making the oleo sacchrum
{oleo saccharum in progress}


Thursday, July 11, 2013

Watercolor paper flowers video tutorial!

Attach the second petal

The lovely ladies at 100 Layer Cake put together a video tutorial for the watercolor paper flowers I made for our wedding. Bonus - it shows you how I put the actual centerpieces together for quick onsite arrangement. Critical if you have a short set up window and can't be fussing with piles of flowers.

You can check it out here. And the click through photo tutorial is here.

It was so much fun to work with those girls, even though video makes me nervous. Luckily it's just hands, so you're spared the awkward grimaces that I make when I'm concentrating on crafts.

Thursday, June 7, 2012

Making invitations

** Sorry this is so belated! I got the post about these invitations started and then forgot about it until a couple readers reminded me. This is the process I used for making Emily's shower invitations. I hadn't planned on a tutorial, so it's more words and suggestions than pictures. Feel free to let me know if you have any questions in the comments and I'll answer. **

I love messing around with paper, so I make invitations regularly (we still send paper invites for the gingerbread house party every year, just because it's fun).

For Emily's shower I wanted to do something special. I started with the idea of watercolors and moved forward from there.

painting
{painting}

Supplies:
Watercolor postcards (similar to these, but I used the 5x7 size)
Watercolor paint (you don't need much at all)
Paint brush
Plate for paint + water
Paper for backing the cards (I used a gorgeous gold I found in a large sheet at Paper Source)
Spray glue
Decent printer (we have this one and we've been really happy with it)
Hole punch (for adding dots, optional)
Tacky glue (for adding dots, optional)
Paper for lining the envelopes (optional)

 - The hardest part is always designing the actual invitation and unfortunately that's the part I can't help with! I design using Adobe Illustrator, but I know you can make it work using Word or Powerpoint and patience. - 

Paint your cards: I painted each postcard individually and set them aside to dry. You could also use larger sheets of watercolor paper and cut them down, but getting the edges all even is time consuming. I love pre-cut cards. I liked the effect I got when I painted a darker line of watercolor along the horizontal edge of the card and then gently painted over it with water, letting it bleed across. Play around.

Once the cards were dry, I stacked them and weighted them down under some stacks of heavy books until I was ready to use them. A couple days really decreased the amount of warping you sometimes get with watercolor.

Print your design: Once I had the design ready, I printed the cards by running them straight through my printer. My printer has a setting for 5x7 (many do, so check your settings) and I used the rear tray and didn't have any trouble with jamming. I always use the best quality setting option when I print invitations, because you get crisper text.

Back your cards: The downside to the post cards was that they had printing on the back (yeah, didn't realize this until I opened them, even though it was stated on the package). Luckily, I found some large sheets of gold paper at Paper Source and they were perfect for backing. Working with 6 cards at a time, I would spray the backs with spray glue (outside, on newspaper) and then quickly lay them down on the wrong side of the gold paper and smooth them out carefully. Spray glue dries almost instantly, so I trimmed them to size as soon as I was finished. I saved the scraps of the paper and ended up using it for the dots.

Add the last touches: I used a regular old hole punch to make the dots and then affixed them to the invitation with dots of tacky glue. My method for tacky glue is to make a small pool of it on scrap paper and then dip a toothpick in it and use that for adding glue to the dots. This part was the fussiest, so I made up one with the general layout I wanted to use and then kept it in front of me as a guideline while I did all the others. Note - this was super time consuming and this is the detail that I would have had to drop or modify if I were making a ton of invitations. I wouldn't recommend this for a wedding!

Enclose: The envelopes were from Paper Source and I picked a soft grey that went with the text and didn't clash with the gold accents. I lined the envelopes with a gold patterned paper from Paper Source. I used leftover stamps from our wedding (and much later realized that the postage had gone up - many thanks to the kind post office employees who delivered all of these despite my mistake).

invitation
{finished invitation}

Tips for invitations:
* Give people the critical information - in addition to the obvious date, time, contact info, response requested stuff I try to include food info, because as a guest prone to hangry attacks I like to know if I'm expecting snacks or a full on meal so that I can eat beforehand if necessary.
* You can include registry information on a shower invitation, but I still steer clear of it. Everyone has to contact the host anyway to RSVP, and they'll usually ask then. That's a personal preference, though. I know some guests prefer getting that information in the invitation.
* Triple check the date/time/address text and have someone else check it as well, if possible.
* Know the mail rules - square envelopes and/or any envelope over 1t oz require additional postage.


Thursday, May 17, 2012

Flags, for lots of things (template provided)

I wanted little tags for our mother's day flower arrangements because each one was created with a particular mother in mind. Of course, I didn't think about this until 15 minutes before we had to leave and I had to scramble.

mother's day flowers
{mother's day flowers}

flowers
{flowers}

flower flag
{flower flag}

Look familiar at all? I re-purposed the file that we used for our wedding dessert buffet flags. Then I printed them out on cardstock and quickly glued them around some bamboo skewers* and popped them in the vases.

I love having a file on hand that I can pull out in a pinch. I always work in Illustrator, but I know that not everyone has it, so I modified the file to make a fillable PDF template. You can use it anytime you need quick tags - weddings, flowers, cheese parties (I'm not sure why that popped into my mind as an example, but I would gladly attend a cheese party, if you happen to throw one).

You can download my template right here. You must download the file to work with it on your computer - if you open it in Google docs you won't be able to use the fillable form function. I've embedded the font that we used in all our wedding designs (Tw Cent MT) and I think it looks best in all caps, but you can play around with it. There are several different sizes, for all your flagging needs.


* My bamboo skewers weren't tall enough to stick out over the flowers so I used two, overlapped them slightly in the middle and them taped them together with packing tape. The ugly part was hidden by the flowers, so it all worked out fine.

Wednesday, April 4, 2012

Fringed lantern tutorial

I first saw these fringed confetti lanterns over at Oh Happy Day and immediately marked them. The originals are actually meant to be filled with confetti, which I intended to do but then I wimped out (I'm really not a fan of vacuuming).

pile of lanterns

The original tutorial is great and uses double sided tape. I'm guessing that it is MUCH faster than my method. My lanterns were large (10" and 14") and they took at least two hours each. I just think of that as four episodes of 30 Rock and it goes by quickly.

I modified it because I needed a bit more coverage (the only lanterns I could easily get had dorky writing on them and I needed to cover it thoroughly) and I wanted to add additional colors and I'm obsessive and wanted everything even. I ran out of time to order the crepe paper folds, so I just purchased regular crepe paper streamers at the store, which means that all the fringe had to be individually cut, which is slower than the original method but gives you a really great, delicate texture. My fringe scissors were a lifesaver here. My method uses hot glue, so take my standard advice and wear gloves if you are prone to burning yourself. I didn't get any burns this time around, but I was careful.

The easiest way to do the tutorial was to put all the photos in a set. Click here to step through them and read my notes and feel free to ask any questions in the comments on this post (sorry - I don't get comment notifications through Flickr, so I'm likely to miss any questions posted there). The photos are dark because the weather wouldn't cooperate, but I think you can get most of the details. Let me know if I've left anything out!

Shopping list: 
- Paper lanterns (I ordered these, because it was easy)
- Crepe paper - (how much you'll need depends on the size/number of lanterns. I got a jumbo roll of the pale pink + a normal size roll each of hot pink and darker pink and it was more than enough for three 10" and two 14" lanterns. This is the standard stuff you get at party stores. I added a bit of gold mylar as well, even though it was a pain to cut)
- Glue gun + hot glue
Fringe scissors (optional but seriously amazing - I got these for Christmas and I love them)

Wednesday, November 16, 2011

Watercolor paper flowers

watercolor paper flower tutorial

Finally. I did promise. I'll be honest here - these flowers are time consuming and if you want lots of them, you'll want to start several months ahead and work steadily. This is the method I used for most of our wedding flowers. (The spiral flowers were made using this tutorial that I've linked to before.) I was trying to figure out how to do the tutorial and realized that it's probably easiest just to send you straight to the photoset on Flickr. You can click through or watch as a slideshow, and I've included notes. It's easier to show than explain, with this. So click here and then you can come back if you need more notes.

You can make the flowers look vastly different, just by tweaking a little. Change from squares to rectangles to make tall narrow flowers. Change the sizes to whatever you want. Adjust how much you trim off the edge, trim in different shapes. But this should give you a nice solid foundation.

Boiled down process:

1. Purchase your paper. I used these exact pads of watercolor paper (I bought the 18x24" size) and they worked well. I spent about $85 on paper, but didn't have enough time to use all of it.

2. Paint your paper, let it dry, press it flat if necessary. I bought a bunch of watercolors, diluted them as I painted. I was originally hoping for a gradient effect, but that would have required a lot more forethought! I ended up with a nice variation in colors, though.

3. Cut your paper. I cut into 3", 2" and 1" strips, using a cutting mat and a rotary cutter. Then I continued on, cutting into squares. The 3" and 2" squares were most easily done with the rotary cutter, but I preferred free handing the 1" squares as they're a bit fiddly.

4. Working a few squares at a time, fold them in half and then trim the edges to round them.

5. When the edges are all trimmed, roll each petal between your fingers to make it into a cylinder. Set aside.

6. Start assembling. Place a dot of glue on one of the base corners of the first petal, then roll it back up and hold it to set.

7. Add a second petal by spreading it out, dotting both base corners with glue and then wrapping it around the first petal.

8. Continue to add more petals. You'll want the petals to flare out more and more as you work your way along. Eventually, you'll end up with a nice full flower.

And, creating the arrangements ...

cocktail table centerpiece, with vase
{cocktail table centerpiece, with vase}

I just laid down sheets of white cardstock, plopped a vase on them and then started gluing the paper flowers to the paper, making a carpet. There was no real rhyme or reason to this and it actually goes pretty quickly. You just want to work with a nice mix of sizes and create a full effect. When you're happy, remove the vase, trim the edges away so that you can't see them and then tuck the centerpiece in a box, ready for transport. This is actually the easiest (and most fun) part of the entire process.

P.S. - If you're looking for more wedding (or party) tutorials, the streamer backdrop and painted tablecloths and hand dyed napkin tutorials are up on 100 Layer Cake!

Wednesday, December 1, 2010

Christmas wreath 2010

https://drive.google.com/file/d/0B2O5HQ3qoYynNTdjNTVjZGQtODZiYS00N2M5LWJjZTEtMmI5NGI1ZTlhZTUz/copyIt's December 1st, officially open season on holiday crafting. We'll ignore the fact that I made this wreath in November, well before such a thing was appropriate.

This year's wreath started, as all good things start, with a large cup of tea. Also, wool felt.

christmas wreath 2010
{christmas wreath 2010}

I traced over some olive leaf pictures and created a black and white file in Illustrator, then printed them and cut each one out. I traced around the cut outs on green wool felt (of course, polyester craft felt works but it simply doesn't feel the same - if you aim for at least 60% wool, you'll be much happier) and also on some metallic faux leather (wanted real leather, but it could not be had) that I purchased from the local upholstery store for $5 for a quarter yard. Black sharpie worked best on both, although I was a little woozy from the fumes. Make sure you trace on the back of the metallic material so you don't have to worry about the lines showing!

Then I cut and cut and cut. This part made me very thankful for old episodes of This American Life.

Pieces all ready, I protected my coffee table with wax paper, set down my wreath frame ($2 at the craft store) and started hot gluing. I attached the ribbon first, because I wanted the leaves to go over it.

christmas wreath 2010
{christmas wreath 2010 - assembly}

At first I tried to come up with some kind of logical process, like applying the metallic leaves first and then adding the felt. In the end, I just ended up gluing like crazy, adding leaves wherever I thought they looked right. This was the fun part.

christmas wreath 2010
{christmas wreath 2010 - gluing}

Adding leaves to the back as well gave the wreath a fuller feel. I initially imagined it as being more sparse, but sparse is actually a lot harder to do and I would have needed to be much more precise with my placement.

christmas wreath 2010
{christmas wreath 2010}

And here it is, hanging on the wall in the grey winter light. I'm probably safe to move it to our front door now, without risking anyone defacing it out of sheer annoyance.

christmas wreath 2010
{christmas wreath 2010}

christmas wreath 2010
{christmas wreath 2010}

If you'd like the leaf file, it's right here. You only need to print and cut out the leaf pages once, but you'll want to trace at least two sets onto your materials. I traced each leaf onto the wool felt twice and then made a half batch using the metallic vinyl.

Here's a little shopping list, if you'd like to make your own ...

Felt (wool or wool blend preferred), ~1/2  to 3/4 of a yard
Metallic leather or vinyl (optional), ~ 1/8 a yard, probably much less
Marker for tracing on fabric (Sharpie is fine, or fabric marker)
Leaf templates (you can use my file or a picture or you can trace actual leaves)
Sharp scissors
Wreath frame (mine was about 14" across)
Ribbon, for hanging
Hot glue gun

Tuesday, November 16, 2010

Super simple printable napkin rings

I starting thinking of this paper napkin ring design while I supposed to be working on something else. Naturally I dropped my other project and made a quick template for these instead. I'm picturing these on the Thanksgiving table - they'll take you 20 minutes, tops.

thanksgiving 2010 paper napkin rings
{thanksgiving 2010 paper napkin rings}

Download the template here (you have to download to get the printable version). You'll need Acrobat Reader. Type the names in the provided fields (font is embedded for you) and print out on nice paper. I used 68 lb cream cover stock. Cut out, slightly around the printed outlines.

paper napkin rings
{paper napkin rings}

zots!
{zots!}

Add some Zots. You could use double stick tape, but Zots are the absolute best, in my opinion.

paper napkin rings - finished
{paper napkin rings, finished}

Voila!

paper napkin rings
{paper napkin rings}

Add a sprig of fresh herbs for extra points. Yours will probably be less dehydrated, because I went out to my balcony to get that rosemary and realized I haven't watered my plants in several weeks. They're mostly dead. Whoops. Why is life so hard to get right?

Wednesday, November 10, 2010

New skirt!

I have been meaning to make a skirt forever. Lest you think that is an exaggeration, I scrolled through my archives to see when this fabric was purchased. January. Maybe not forever, but way too long for a project that takes less than two hours.

print skirt
{print skirt}

The fabric is silk twill (was marked down from $20 a yard to $5) and it feels amazing.

I used the wonderful Freshly Picked elastic waist skirt tutorial but made a few changes of my own.

The tutorial calls for the length of your fabric to be double the width of your waist. This gives you a very full skirt, which looks adorable. On everyone else. I tried it on while it was pinned and quickly realized it wasn't going to work for me. I ended up using 1.5 times the width of my waist, and I love it.

I didn't have elastic quite as thick as I'd like for a defined waist band (3" would be ideal, I think). I was worried that my 1.5" elastic wouldn't really make a statement and would look lazy. So I made a simple fold over pocket and hid the elastic altogether.

To get the most out of my fabric, I cut two pieces for the skirt panel rather than one. I wanted the skirt to be a bit shorter, to wear with tights. My fabric was 45" wide, which meant that folding it in half gave me enough  length (22.5"), even once I allowed for the upper pocket for the elastic. That meant I could use the entire piece of fabric, rather than cutting off something twice as long and narrower. Sewing up one extra seam was definitely worth it.

Elastic waistband skirt

For a quick summary of the steps I used, you can click on the link below the picture. Please note that I'm 5'6, so if you are very tall or very modest, this might not work for you. However, I had enough length to easily make the pocket for the elastic and I had a relatively deep hem, so you could certainly make a skirt a bit longer than the one pictured here using the same technique.

EDIT - I just noticed that if you're a newbie sewer, you might want a couple of additional tips, because I don't go into great detail on this step by step.

1. The iron is your friend. Every time you make a fold that you're going to want to sew, press it well. Every time you sew a seam, press it. For an open seam, like in step 3, you should press it twice. First press it flat to strengthen the bond between the top and bottom thread, then you should gently open the seam with your fingers and press it open, so that it lies nice and flat when you wear the skirt.

2. Pins. I hate pinning because it always seems like a tedious waste of time, but it was useful here. When you need to sew a folded seam, iron first to get a nice crisp fold, then add a few pins to keep it all in place. As you sew on the machine, pull each pin out just before you sew over that area. Once you're experienced, you won't need to stop the machine or even slow down much to do this.

I think that's it. If you have questions, feel free to ask in the comments! I'm certainly not an expert on sewing clothing though, so don't expect too much.

Wednesday, September 16, 2009

Mini knots - headband tutorial

Do you remember this tutorial for the knotted headband? I was thinking about it a few weeks ago and decided I wanted to make some mini versions. Because everything is cuter in miniature.

So, follow this tutorial, just like before...

friendship-knot

But use crochet thread instead of strips of fabric. One length of thread should be measured by wrapping it around your head (add a bit extra if you are going to want to tie it) the other piece of thread (the one you'll be using to make the knots around the first piece) needs to be approximately six times as long as the first. Yes, that is very long.

You can vary the width of the finished piece by using more than one long thread (just bundle them together and make knots as if you have a single thread). For visual interest, I made three knotted strips for my headband, in three different widths. I secured them with a bit of elastic at the bottom. I've been wearing it non stop for the last two weeks.

Web
{front & back}

There are a few up in the shop, for those of you who prefer to outsource (and because they are so compact, I'm offering free shipping!). I'm not sure if these will end up being in the shop all the time. To be honest, as much as I love making them, they are very time consuming and my poor hands don't love making all those knots. The first day I made these I went overboard and woke up the next day with swollen finger joints. Take it easy, if you want to make these.

new pieces
{pretty jumble}

Now if I were a camp counselor, I would totally put some kids to work and crank these out nonstop. Kids will do just about any manual labor for a couple pieces of candy. It doesn't even have to be particularly good candy. I once spent an entire afternoon stuffing envelopes at camp and I was paid with 5 Jolly Ranchers and I was pretty sure I'd gotten a great deal. Ah, youth.


*This tutorial is provided for personal use only. Please do not sell this tutorial or create items for re-sale using this tutorial. Tutorial may be re-published only with my permission.

Thursday, June 11, 2009

Ruffly headband tutorial!

I finally managed to get some photos of the headband process. You need a lightweight fabric. I highly recommend thin china silk, which is what I used for Rena's birthday headband, but for the tutorial I used this very light cotton/linen blend and it was lovely as well.

finished product

The tutorial is all photos, so let me know if you have any questions.
UPDATES: Good questions have been asked & here are some answers - you need very little fabric, probably less than 1/8 of a yard. The squares shown here were about 2", but that's flexible. Any size will work and I wasn't particularly fussy about making them all the same size. Variation is nice. I think I made about 10 blooms for this particular headband, which means I needed 20 squares. The blooms are pretty tightly packed. You could use fewer blooms for a looser effect.

500-px-ribbon-headband-tuto

And voila...

finished product

P.S. The edges are left unfinished, which means you can't just toss it in the washer without the risk of serious unraveling. But it's a headband, after all, so hopefully it won't need heavy duty cleaning.

P.P.S. The reason the tutorial tells you to start in the center of the length of ribbon and work in one direction is because you want to wear it over to one side. Trust me. Putting the pouf directly on the top of you head makes you look like you are sprouting a very unlikely growth. Don't do it.

P.P.S. Just for fun I tried holding it up to my waist and I fell in love. Next time, I'm making a skinny belt. Stay tuned.


*This tutorial is provided for personal use only. Please do not sell this tutorial or create items for re-sale using this tutorial. Tutorial may be re-published only with my permission.

Thursday, April 2, 2009

Another headband...

Making a new headband is so fast and easy that it makes me feel very productive.

second headband

This new one is slightly different from the last. Instead of braiding, I tried knotting it.

Want to make one? It's very, very simple, especially if you used to spend lots of time making friendship bracelets.

friendship-knot

Once again, I just tied it around my head. One of these days I'm going to get some elastic.


*This tutorial is provided for personal use only. Please do not sell this tutorial or create items for re-sale using this tutorial. Tutorial may be re-published only with my permission.

Monday, December 22, 2008

Meal planning notepads, part II

Still whipping up a couple of last minute holiday gifts...

The meal planning notepads have evolved. (Click the picture below to see the full sized image.)

Want to make your own? Click the picture to see the full size image, save it to your desktop and then print it as a full page document. Print out as many pages as you would like (I make my pads with 50 sheets, which means I print 25 pages) and then cut them straight down the middle.

Bonus points: I perforate the sheets right above the grocery list portion using my beloved rotary cutter with the perforating blade. This makes it easy to simply tear off the bottom portion to take with you to the grocery store.

Create the notepad as described in this post. For more detailed instructions, see Sarah's post, where I got the idea from originally.

Use magnetic backing (I picked up some rolls like this at Home Depot) to allow you to stick them to the refrigerator for easy access.

I made a personalized version of these for each of the families on my Christmas list. Hopefully they go over well.

*This tutorial is provided for personal use only. Please do not sell this tutorial or create items for re-sale using this tutorial. Tutorial may be re-published only with my permission.

Thursday, December 18, 2008

Tool belt apron tutorial

Okay, guys. This is my first tutorial, and it's pretty basic. If you have any questions, please ask them in the comments and I'll respond. It's instructions for making a tool belt apron like the one I mentioned in an earlier post.

The tool belt apron was one of the first things I ever made and there is no pattern. That should give you an idea of how simple it is to make. If you can cut fabric (even somewhat poorly), iron fabric and sew semi-straight lines, you can easily bust one of these out in an hour or so. After you've made one (or if you have any experience sewing), the time comes down to about 20 minutes.

These are one of the projects that are ideal for using up vintage sheets. Make sure your sheets are all cotton, otherwise they can be hard to iron. Cut out a rectangle of fabric from the top of the sheet, so that you still have the top seam intact. It should be approximately 23 inches wide and 17 inches tall, but exact sizes don't matter much.

DSC_0578

If you have a side seam left on the sheet, cut it off. I use a straight edge and an Olfa cutter to make it easy, but you can use scissors if that is what you have. I do a quick check to see if my rectangle is at least roughly even at this point because I am not terribly good at cutting things out properly.

DSC_0579

Make a double fold along the bottom edge of the fabric and iron it in place. This is going to end up being the hem on the top of the pocket.

DSC_0601

Once you have it ironed, sew a straight stitch the whole way across to make the hem. Then take your fabric back to the ironing board and fold the bottom edge up to create the tool belt pocket. The folded part of the hem should be on the inside of the pocket so that you don't see it.

DSC_0602

I usually make the pockets about 7 inches deep, but you can play around with it to see what suits you. If you want a slightly longer apron (I'm only 5"6) you could make a slightly shorter pocket and it would work fine. (If you aren't using a sheet, repeat the step for hemming the bottom edge on the top edge).

Once you have your fabric lined up the way you want it, iron it in place and then make a small double fold along both short sides. These will be the hems on the sides of the apron. Press them well and then sew a straight stitch along both sides.

DSC_0603

At this point, the apron should look something like this.

DSC_0605

You have all the edges finished and one long pocket running across the front. Now you just sew in pockets wherever you want them by running straight stitches from the bottom of the pocket up to the top hem.

DSC_0606

I usually make a couple of skinny pockets along each side, leaving a relatively wide pocket in the middle. The skinny pockets are perfect for stashing wooden spoons or spatulas.

DSC_0607

Here's a close up of how I sew the pockets. I try to aim for running the seam right into the seam of the hem. You'll notice that I use white thread. This is partly because I love contrasting seams and partly because I am so lazy that I hate having to switch out the thread on my machine and I tend to use white for everything.

Once you have as many pockets as you want, you just grab a long piece of twill tape. How long depends on how you want your apron to tie. I usually make it long enough so that I can wrap it around and tie it in the front, which means I need almost 90 inches of twill tape, but if you just want to tie in the back you could get away with using a lot less. I picked up white 3/4 inch wide twill tape at my local fabric store for 79 cents a yard, so it doesn't make this into an expensive project.

Place the twill tape along the middle of the top portion of the apron and sew it in place along the top and bottom edges of the tape. I don't have a picture of this because it was dark when I did it. Sorry.

And voila!

DSC_1123

The stamps on this apron were done using my lino cuts and fabric ink.

The nice thing about this project is that it isn't very fussy. None of the measurements need to be very exact, and even if your seams aren't straight, it still ends up looking adorable (I just tell myself the crooked seams add character). And it's so darn cute that even D likes it when I wear it around the kitchen. In my book, an apron that a guy is into is a pretty good thing.

Feel free to let me know if you need any clarifications. I've never tried explaining one of my sewing projects to anyone and I'm not sure how clear this is when you read over it.


*This tutorial is provided for personal use only. Please do not sell this tutorial or create items for re-sale using this tutorial. Tutorial may be re-published only with my permission.