Showing posts with label cookies. Show all posts

Thursday, January 5, 2017

Christmas 2016

I spent a lot of time in the kitchen leading up to Christmas, and absolutely zero time shopping, which is exactly how I prefer it. I made a bunch of Christmas cookies, as usual, and packaged them up. I made this crazy lasagna for Christmas Eve dinner. It's my absolute favorite, but it takes basically a full day to put together. Luckily it can sit in the fridge for a day once it's been assembled, so I made it on Friday (along with Caesar salad dressing, croutons, and garlic bread). Then on Christmas Eve morning I woke up feeling like I had nothing to do so I baked a yule log. Emily introduced me to this tradition last year and this year we did a virtual baking session from our respective kitchens, texting pictures and recipes back and forth as we worked. (Notes on the recipes at the bottom of the post)

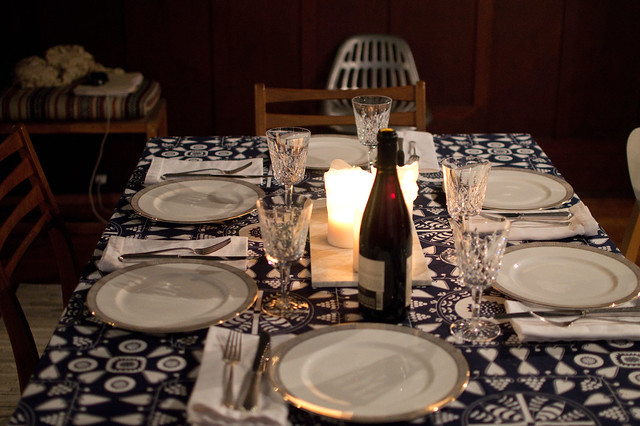
Christmas Day was a blur of driving and family and then we had a whole freaking week when we were both on vacation and at home, which never, ever happens to us. We made this huge list of things we wanted to do and then instead of doing most of them we took turns catching colds and ended up binge watching a bunch of TV and using the fireplace as much as humanly possible. It was still pretty wonderful.
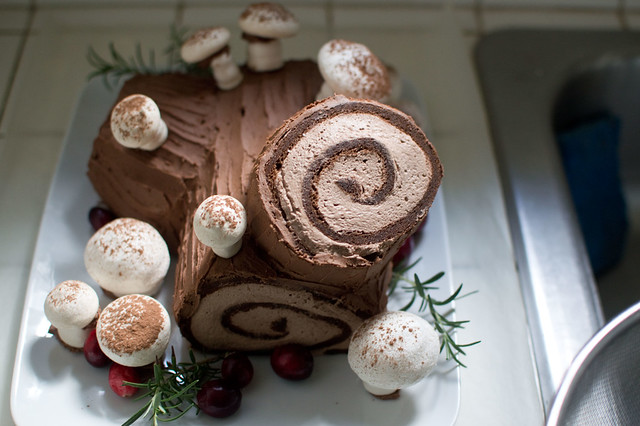
cookie boxes 2016
buche de noel
christmas eve table 2016
christmas eve dinner 2016
stocking stuffers 2016

Bûche de Noël (aka yule log) I think this is going to become a tradition, so I promised myself I'd write down some notes for when I inevitably forget everything next year.

We used this recipe for the sponge cake + filling. Super simple, tasty. I didn't have any trouble with it except that the recipe specifically calls for a 10x15" jelly roll pan and I only have my beloved half sheet pans (closer to 12x17" if you're looking at the interior measurements) and a couple quarter sheet pans (9x12") from when I had a miniature oven. I stressed about whether I should try to scale the recipe up a bit, but decided against it and as it turns out I think the half sheet pan is exactly what you need. It filled the entire pan perfectly.

Notes -
- Beat the egg yolks thoroughly (3 - 5 minutes in a Kitchenaid). They should be very thick.
- Put parchment paper in your sheet pan and then spray it with oil. I had no issues peeling the parchment off, but some of the reviews mention that if you don't spray with oil it can suck trying to get the paper off.
- The filling is just whipped cream with cocoa powder, and I was afraid it would collapse quickly, but it held up pretty well. I made this the same day we ate it, but the leftovers were good for another couple days, so it would be possible to make it a full day ahead, possibly two (do NOT put meringue mushrooms on until the day you are serving it, though).

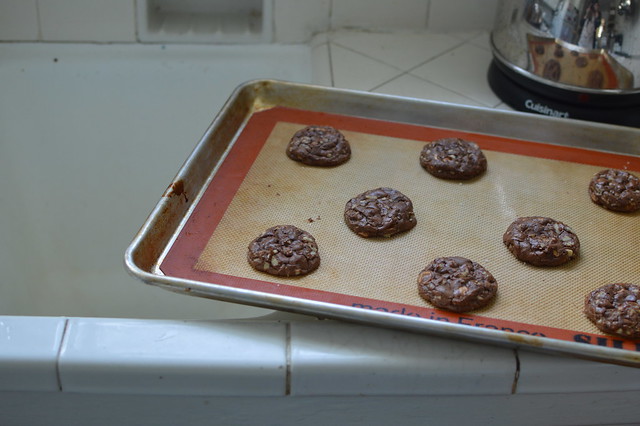
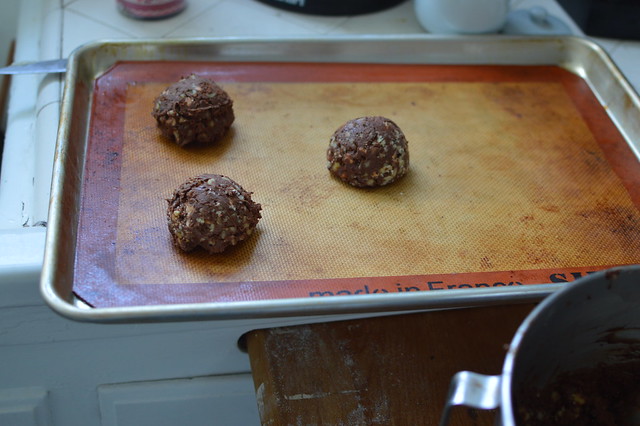
Mushrooms - I used this recipe for meringue mushrooms. I used superfine sugar instead of regular granulated because I always do for meringue (I don't buy superfine sugar, just blitz regular granulated sugar in the food processor). Some reviews mentioned the meringue being too salty, and I did notice that I could taste salt, but I actually liked it and no one else commented on it. Maybe reduce the salt a bit at first and taste before adding more? I didn't have a large enough circle tip, so I just cut the tip off the pastry bag. I didn't assemble the mushrooms with melted chocolate as the recipe called for because I was feeling lazy so I just stuck the tops and bottoms together with buttercream. I had watched Emily make the mushrooms last year, so I winged the technique but if you want to see someone do it this looks like a very detailed tutorial, although the video is crazy long (tip - she starts piping around 12 minutes if you need to jump ahead). Meringue will get sticky if it's damp out, so if you're making these ahead of time store them in an airtight bag. I found that mine were fine sitting on the cake for 12 hours, but by the 24 hour mark they were starting to get sticky. The ones in the bag held up perfectly for 3 days (probably would have lasted longer except I ate them all by then).

Chocolate buttercream - I used this recipe for chocolate buttercream and it was tasty but sweeeeeeeeet. I might try something less sweet next year (I usually prefer flour or pudding based buttercreams - Bravetart has my favorite buttercream recipes and tips and I particularly love her German buttercream although I'm not 100% sure it is sturdy enough for this purpose - maybe a ganache frosting of some sort?). But everyone else loved the sweet buttercream so maybe I'll just stick with it because it was super easy. One important note - this recipe makes at least 3 times as much frosting as you could possibly need, even if you are frosting heavily (which you don't really need to do with a yule log). I'd at least cut it by half, possibly by a third.

Making the branches - The recipe I used doesn't explain how to make the branches. I know last year we found a description somewhere but I can't find it now. Basically, I fill the yule log exactly as described in the cake recipe. At this point, I roll it up tightly in a kitchen towel and place it in the fridge, ideally for an hour or two. Then I remove the dish towel, place the cake on a cutting board and cut a slice off each end with a sharp knife (just enough to clean up the edges). To create branches, I then cut off a larger piece from one end (maybe 5" or so?). I cut this piece in half at an angle, creating two pieces that each have one straight side and one angled side. Transfer your log to a serving plate, then add the branches.Using frosting, adhere the angled side to your log wherever you want it. I put one branch coming off the side and one coming off the top, but you can have just one branch or no branches at all, of course.

Frosting - Once your branches are in place, carefully spread buttercream over the entire cake (leaving the ends exposed if you like). I used a small offset spatula with a tapered head for this (mine is like this one), and then just dragged the tip of the spatula in brush like strokes to create texture. You can also create a bark-like texture using the tines of a fork.

Decorating - for finishing touches add the meringue mushrooms on both the cake and the plate using buttercream to stick them in place (again - I'd wait to put the mushrooms on until the day you are serving the cake, if you made it ahead). This year I added sprigs of rosemary from the garden, and a few cranberries for color and then dusted the whole thing with powdered sugar (place powdered sugar in a sifter or fine strainer, then gently tap over the cake).

IDEAS FOR NEXT YEAR: I like having the two branches, but this makes a somewhat stumpy cake (ha). Next year if we want to get ambitious I think it would be fun to work together and make three batches of the cake + filling. This would allow us to get two full length yule logs and use the third cake solely for branches. If you're making more than one cake, you still just need one batch of mushrooms (could probably decorate 3 - 4 cakes with one batch). The frosting recipe I used this year could be cut in half and still frost two cakes easily, I think.

Wednesday, May 11, 2016

White chocolate chip cookies

No idea why it took me so long to do this ...

white chocolate chip cookies

I usually make white chocolate chip cookies for Em's birthday, but since it's the only time all year that I make them I'm always scrambling for a recipe. I think I've tried a different one every year, and they've all been good (when are cookies bad, really?) but I keep thinking I'll find the perfect recipe to stick with.

And then I realized I already had the perfect recipe - the famous NYT chocolate chip cookie recipe, but with white chocolate subbed in for semi-sweet. They were so good that I couldn't stop eating them, and I'm not really a white chocolate person. This year I used the mini white chocolate chips from Whole Foods because they were decent quality and readily available, but next year I might try getting a high quality white chocolate bar and then breaking it into chunks. Hopefully I remember that a year from now.

I have to say that the last few times I've made this recipe I've made the cookies a more realistic size so that people are less intimidated by them. The original recipe calls for using a huge scoop of the dough for each cookie and you get massive, bakery sized cookies (a #12 scoop works well). Perfect for a special treat, but a little much for putting out in the break room. This time I went big and of course, they are so much better this way. The texture is just perfect, soft in the middle and crisp at the edges. So I'm back with my old debate - make enormous cookies and hope people will just split them if they want less cookie? Make normal sized cookies and accept the not-quite-as-perfect texture?

Friday, March 4, 2016

Best oatmeal cookies

Chewy oatmeal cookies in one bowl, no mixer required.

best oatmeal cookies

I like oatmeal cookies but they aren't my favorite so I rarely make them. But when I saw that Stella had developed a recipe, I decided to test them out. Every recipe I've tried of hers has been delicious, so I trust her implicitly. Also, we were having people over for dinner and I was a little bit short on flour, so my dessert options were limited.

best oatmeal cookies

These turned out soooo well. They are chewy but still a little crisp and the flavor is perfect. I meant for D to take the leftovers in to work, but they were so good that we ended up eating almost all of them over the course of the weekend.

I followed the recipe almost exactly, except that I used chocolate chips instead of unsweetened cranberries and I made the scoops 1.5 oz instead of 1 oz. What can I say? I like big cookies.

The recipe calls for regular AP flour, and I only had unbleached, so I think they spread a bit more than they would have otherwise. Really interesting explanation of why she recommends not using unbleached flour in the comments, right here.

I am definitely looking for an excuse to make these again very soon.

Tuesday, July 15, 2014

You need these ...

Just a quick public service announcement. If you haven't already discovered the peanut butter chips from Trader Joe's, you're missing out.

the best thing
{the best thing}

I've been swapping them in for half the chocolate chips called for in my favorite recipe (I usually just cut the chocolate in half, because I like more cookie than chip). They are slightly salty and so, so good.

They get soft easily so I keep them in the freezer. But that might just be because our kitchen becomes an oven at the drop of a hat. Hard to tell.

Tuesday, April 29, 2014

CHOCOLATE cookies

If you want a cookie that is basically chocolate, straight up, this one's for you.

chocolate cookies
{chocolate cookies}

I've shared these cookies before but it was years ago and I think they deserve a second go-round. I almost always make a double batch (the recipe below is the double batch - you can cut it in half easily) because the dough freezes well and I think cleaning up a bowl of chocolate dough is such a pain that you should really maximize the number of cookies you get out of it.

The only changes I've made are to increase the salt (I still think it might be a little low but I'm reluctant to advise you to increase it further without testing it myself - I do sprinkle a couple flakes of sea salt on each cookie as well) and swap out the white chocolate chips for peanut butter chips from Trader Joe's. These are great with white chocolate but I think the peanut butter is even better.

Chocolate cookies (makes a TON of cookies but the dough freezes well, can be cut in half  if you're not ready to commit - original recipe here)

2 pounds bittersweet or semisweet chocolate, chopped (I use chocolate chips)

1/2 cup unsalted butter
1 cup all purpose flour
1 teaspoon. baking powder
1 teaspoon salt
8 eggs
1 1/2 cups brown sugar
1 1/2 cups granulated sugar
20 oz. peanut butter chips (can substitute white chocolate chips)
4 cups chopped walnuts
Flaky salt for finishing

::  Melt the chocolate and butter over hot water. You don't have to have a double boiler. I just take one of my aluminum mixing bowls and rest it over a pot with boiling water in it and it works well enough. If you have a microwave, use it. Just stir every 30 seconds or so. Once the chocolate is melted set it aside and let is cool slightly.


:: Whisk together the flour, baking powder and salt in a small bowl. 


:: Beat the eggs with the sugars until light and stir in the melted chocolate. Add the flour mixture, peanut butter chips and nuts. Refrigerate the dough for at least a couple hours (it will be way too sticky until it cools down).


:: OPTION 1 - Shape the dough into rolls, like refrigerator cookies. This is a little tricky. Keep your hands well floured and don't worry too much about the mess. You'll have to experiment to see how thick you want the logs to be. Wrap with saran wrap, and then wrap with aluminum foil and put in a ziploc freezer bag if you plan to store them for more than a few days. Wrapped up well, they will last for at least 2 months in the freezer (probably longer, but they usually get eaten quickly). Let them sit in the freezer for at least a day before you try to cut them - it works better if they are really frozen solid.


:: OPTION 2 - Scoop and bake. This is what I've been doing lately and it works perfectly well. I think the extra large cookies bake better but the smaller ones are more socially acceptable. This last time I made both sizes, using a 1/3 cup cookie scoop (#12) for the enormous cookies and a much more modest one (#50) for the smaller ones. The dough is thick so it can be hard on your cookie scoops. I was careful to clean them out with a small spatula after every few cookies. You can freeze the scoops too, as I describe here

:: Preheat the oven to 350 degrees F. Line cookie sheets with parchment paper or Silpat - they will absolutely stick to the sheet if you don't. If you made rolls, slice the cookies 1/2 inch thick. Sprinkle each cookie with a few flakes of sea salt. 

:: Bake until they lose their sheen. It's hard to tell when these are done but when the top seems dry and is no longer glossy you're usually good to go. Let them cool fully on the cookie sheet. They'll fall apart if you try to move them while they're still warm. They should be moist and chewy inside once cooled. 

Baking time estimates: 
                  Sliced cookies (1/2" thick) - 10 - 12 minutes
                  Scooped cookies (small #50 scoop) - 10 - 15 minutes
                  Scooped cookies (large #12 scoop) - 15 - 25 minutes (check every 5 min)


big ones
{big ones}


Friday, December 6, 2013

Putting together the gingerbread house party

Last year I wrote this up as I was prepping and then never posted it because the party wore me right out. This year might be the first time in nearly three decades that we aren't able to have the party and that makes me sad, even though I realize that adding a big party on top of our move and some ongoing house renovations at my parents' place probably would be hard for everyone involved. Maybe we'll manage to pull it together but in the meantime, I'll try to be a gingerbread house enabler.

cookie cutters
{cookie cutters}

The beginning of December is generally very busy for me at work but luckily the baking can be broken up into parts that I can handle in the evenings after a full day. Here's how it went down last year.

gingerbread spices
{gingerbread spices}

We needed 12 houses so I planned on making 15. I always have a little wiggle room in the numbers. That way if you break a piece or have a house that comes together wonky you don't need to stress. If they all turn out perfectly, well, a decorated house can be a sweet surprise for a coworker, neighbor, etc.

Tuesday morning I measured four sets of the spice mixture, the baking soda + baking powder and the brown sugar. I set out the butter and the eggs. Three batches of dough will make the 15 houses I planned for and the extra one is for cookies, of course. Here is the dough recipe I use, which I love. The only issue with it is that the scraps of raw dough are so good that Dustin and I basically live on them all week and feel mildly disgusted with ourselves.

Tuesday evening when I got home from work I made all four batches of dough assembly line style so I didn't have to clean out the mixing bowl between. The recipe lists the flour in cups so for the first batch I weighed the flour I measured out (1 lb 13.5 oz) and then for the remaining batches I didn't have to bother with the measuring. Much faster. Each batch gets bundled in plastic wrap and refrigerated.

Wednesday - Friday I baked in the evenings. I always make a list and keep a tally so I know how many of each piece I have (for 15 houses it is: 30 roofs, 30 walls, 15 fronts, 15 backs, 15 doors). Once the pieces have cooled completely I put them in large ziploc bags. If you aren't putting the houses together very soon, you should do this. The gingerbread will pick up moisture from the air quickly and you end up with soft pieces that, while perfect for eating, are structurally unsound. This is also why you can't put the houses together too far ahead. Even a couple days of damp weather and everything falls apart. Once you get enough royal frosting on, the houses will usually hold up really well. We've had a few years where it was so damp that the roofs slid off, but that's rare.

You also want to prepare the cardboard bases for the houses ahead of time. The house footprint is fairly small but I aim for nothing smaller than 9x12", to give people some yard space to play with. Wrap each piece of cardboard in aluminum foil, secured on the bottom with packing tape.

The day of the party we cover the old table with aluminum foil and then lay all the pieces with windows out. Do this on a surface you aren't worried about. I've never noticed that it damages the finish of the table, but we use our giant holiday table that's already scarred.

I make the sugar syrup as described here and pour all the windows (note - on top of everything else last year my thermometer was reading too hot and as a result, my windows never set up. Sadness. I've edited that post to remind myself not to blindly trust the thermometer in the future - it takes less than 5 minutes to double check that the syrup is hot enough). Having two people pouring can be useful here, but it isn't necessary. You just want to do it quickly, to minimize the number of times you have to reheat the sugar.

The windows (should) set up quickly and in the meantime I get the kitchen ready for the gingerbread house assembly, as described here. Having a small island or table next to the stove makes this much easier. Pick one you aren't worried about or cover it well. Have your aluminum covered cardboard pieces handy.

gb 2010 blank house
{gb 2010 blank house}

Once the houses are ready we set them all out on the long table. If you have guests who take the house selection seriously, it helps to put out name tags so that people can claim their houses on a first come first serve basis and then your guests don't feel like they have to hover next to their chosen house the whole time.

I make a giant vat of royal frosting, mixing several batches and then combining them. I don't have a recipe on hand so I always end up doing a quick internet search when it comes time to make the frosting (should change that!). I use meringue powder + powdered sugar + warm water in whatever proportion you are supposed to use. I fill several pastry bags (aim for one per person, use couplers and put out extra tips so people can change it up easily) and set them in tall glasses with a bit of damp paper towel at the bottom. This keeps the frosting in the tip from drying out and clogging. When filling pastry bags, only fill 1/2 - 3/4. Keep it closer to 1/2 if you have small kids because it's hard for inexperienced people or tiny hands to handle overly full bags. It's also good to have a medium size bowl full on the table with a spatula.

We ask our guests to bring some candy with them and so we put out a bunch of empty bowls on the table. It's much neater than having bags of candy everywhere and it lets people see what's available. Some years there is a moderate level of candy hoarding going on, but now that we're adults we'll usually share if you ask nicely (actually, kids are way more willing to share because they don't understand how important it is that their houses look neat and symmetrical so they will just slap random candy everywhere if necessary. Amateurs).

Popular decorations:
Spice drops
Dots - my personal fave because I also love eating them
Holiday M&Ms
Peppermint candy in all forms - red and white themes are usually a hit, so having plenty of candy in that color range helps
Chiclets - surprise contender from a couple years ago, makes nice tiles
Shredded coconut is good for snow

I make cookies as well and usually set aside a batch to bake right before guests arrive, so that the house is completely filled with the smell of gingerbread. Having some little bags ready so that guests can take a small pile of cookies home is a nice touch and will sometimes prevent people from eating their gingerbread houses immediately. Technically, you are supposed to wait until Christmas Day to eat your house. I can't guarantee that all our guests obey.

You want food to balance all that sugar, so we have everyone bring an appetizer and set everything out on a table in the living room. We use the crock pot to make mulled cider. Spiking is optional, but highly encouraged now that almost all of our guests are way above the age at which you would expect gingerbread house decorating to be popular.

Please note - playing John Denver and The Muppets at least once is MANDATORY. Saying you are "sick of the album" or "don't like Miss Piggy's voice" is not an excuse and I'm not buying it.

Thursday, December 5, 2013

My very favorite gingerbread recipe

A sweet reader emailed me about my gingerbread house recipe the other day and I realized that I've never posted about it, which is a shame, because I found a keeper several years ago and I'd never even consider swaying.

gingerbread cookies
{gingerbread cookies}

I use the gingerbread house recipe from Martha Stewart and while I love her, I have issues with her site. The links change, recipes are edited or deleted and the site is hard to search and slooow. I can't be the only one who notices this, right?

I'm going to type out the recipe right here, in case the links disappear again. This recipe makes the very best gingerbread, for houses or cookies. It's spicy, easy to work with and quick to mix up. One batch will make enough dough for 5 small houses, using their template (really hoping that link never dies...) Our family used to make these enormous, absolutely gorgeous custom gingerbread houses and I cried a bit the first year I had to scale back to the small template. But as it turns out, most people find the smaller houses more approachable and kids are less likely to lose interest and run off halfway through the decorating. Serendipity?
Best Gingerbread Cookies (recipe from here, makes a ton of cookies, or 5 small houses) 
1 teaspoon baking soda
1/2 teaspoon baking powder
1 cup (2 sticks) butter, room temperature
1 cup dark brown sugar
4 teaspoons ground ginger
4 teaspoons ground cinnamon
1 1/2 teaspoons ground cloves
1 teaspoon finely ground black pepper
1 1/2 teaspoons salt
2 large eggs
1 1/2 cups unsulfured molasses
6 cups all purpose flour (1 lb 13.5 oz)
:: In a large bowl, shift or whisk together flour, baking soda and baking powder, set aside.  
:: In an electric mixer, cream butter and brown sugar until light and fluffy. Mix in spices and salt, then beat in eggs and molasses.  
:: Add flour mixture in 2 - 3 parts, mixing on low speed until combined. To avoid a flour explosion, I wrap a dishtowel around the mixer to cover the opening of the bowl. If you're using a standard Kitchenaid, it will be pretty full here. Divide dough in thirds, shape into disks or rectangles and wrap in plastic. Chill for at least one hour, or up to a few days.  
:: Heat oven to 350 degrees. On a well floured surface, roll out dough to 1/8" thick. Cut out cookies (or house pieces). Place dough on ungreased baking sheets (I always use my Silpats, though). Pop the tray back in the refrigerator and chill for at least 15 minutes. This helps your cookies hold their shape better. Bake 15 minutes, until gingerbread is firm in the center but not dark around the edges. I bake a little longer for house pieces, because sturdiness is a high priority. I like my cookies chewier, so I bake them a little bit less. 

If you're making gingerbread cookies, you can leave them out at room temperature uncovered and they'll still be great for weeks* and the flavor is definitely improved if you can let them sit for at least a couple days.

If you're making gingerbread houses, let the pieces cool completely and then put them in ziploc bags until you are ready to assemble. You don't want them picking up any moisture from the air because it will make your houses less stable.

Last year I keep a draft post running while I prepped for the gingerbread house party, so that I could share it with you all because I sometimes get inquiries about GB house party logistics, which I take seriously. But then, for reasons mostly unrelated to gingerbread and entirely related to some family medical issues, the party ended up being very stressful for me and I just felt like I'd be a fraud posting about how awesome I am at throwing parties. Now that a year has passed I'm realizing that the post might actually be useful, so I think I'll dust it off and pop it up for you shortly. I'll make sure that it links to the various gingerbread tips I've given over the years, since they're currently scattered all over the blog.


* This will probably horrify everyone, but we almost always give out extra large gingerbread cookies on Christmas, cutely wrapped. A couple years ago I was getting out the wrapping supplies and found a cookie from the previous year in a gift bag. It still looked perfectly normal, so I ate a corner of it only as a test, for science. It tasted fine, and I didn't die. But I did throw out the rest of the cookie because I thought eating a year old cookie just seemed too desperate. I have a sweet tooth, but it hasn't come that yet, thank god.

Wednesday, January 18, 2012

Lemon ginger cookies

I made these cookies last weekend for my cousin's wedding. The original recipe makes thick cookies that you  slather with a lemon buttercream. Perfect showstoppers for a wedding, but it's hard to justify a buttercream sandwich for everyday eating.

cookies, stacked
{cookies, stacked}

The cookies by themselves on the other hand? They are perfect for an afternoon treat. The addition of almond meal makes the texture delicate and the flavor almost wheat-y. They're more lemon than ginger, though, and I'm a ginger addict. I think in the future I might try finely chopping crystallized ginger and adding it to the mix. You can double this recipe in a stand mixer with no problem at all.

baking
{baking}

Lemon ginger cookies (makes 18 if you're going for 3" cookies - original recipe from here)

2 cups unbleached all-purpose flour
1/2 teaspoon salt
2 1/2 teaspoons ground ginger
1 teaspoon ground cinnamon
1 cup unsalted butter, room temperature
1 cup powdered sugar
2 teaspoons lemon zest, finely grated
1 teaspoon vanilla extract
1 cup whole blanched almonds, toasted, ground (I used 4 oz of TJ's ready made almond meal, which is amazing and a huge time saver)

:: Mix the flour, salt, ginger and cinnamon in a large bowl and set aside.

:: Whip the butter and powdered sugar together until light and fluffy, about 3 minutes on high (I usually get this going and then measure out the rest of the ingredients).

:: Stir in the lemon zest, vanilla and almond meal.

:: Stir in the flour mixture. I found that it worked best if I used the mixer on low speed to incorporate most of the flour, but I had to finish it by working the dough by hand briefly. The dough is fairly dry but it rolls out beautifully once you refrigerate it.

:: Divide the dough in half and shape into discs. Refrigerate about one hour, to make the dough easier to handle.

:: On a lightly floured surface, roll out one disc at a time to just under 1/4" thick (this is pretty thick, especially if you're used to rolling out 1/8", which is more standard) and cut your preferred shape. I used 3" scalloped edge circles. Set aside the scraps and then repeat with the second disc. Gently knead the scraps into a ball and roll them out to get a few more cookies. I only did one re-roll, although you might be able to eke out one more without affecting the texture too much. We just opted to eat the scraps instead.

:: Bake the cookies in a 325 degree oven for about 14 minutes, until the tops are firm and the bottoms are golden brown. You don't want to overbake them as they'll start to taste burned quickly. The original recipe suggested 20 minutes, but that was way too much for my oven (the little stack you see in the top picture is overbaked!). I would start checking at 14 minutes and add extra time if necessary.


These don't have any eggs - that's not a typo (trust me, I checked the original recipe about 20 times to convince myself I wasn't messing it up when I made them). They really don't need them. I was worried about the dough being cohesive enough, but it really does come together. Promise.


Tuesday, December 20, 2011

Christmas, accomplished (melomakarona)

I fell in love with melomakarona when I was in Greece. They are bite sized Christmas, infused with citrus and cloves, spiked with a wee bit of brandy, soaked in honey, rolled in walnuts. I purchased them from every bakery that had them, taste tested them rigorously, vowed I would make them every year.

citrus
{citrus}

The first attempt, it did not go so well. There are difficulties when working with Greek recipes. Many of them seem to assume that you grew up with a yia-yia who taught you how to bake properly and the recipes are more memory aids than explicit instructions - how frustrating is it when the recipe simply says "add flour as needed"?

Then there is the olive oil issue. Olive oil desserts are popular in Greece, and they're delicious. Good olive oil is light and sharp and it plays well in baked goods. Try using the olive oil we have readily available here and you will quickly regret it - the flavors are muddled and overly strong.

So that first batch of cookies was dense (I kept adding flour) and redolent with the scent of cheap olive oil. I shelved my baking aspirations and bought the cookies for a couple years.

shaped melomakarona
{shaped melomakarona}

But this year, if I managed nothing else, I was determined to make melomakarona. I was prepared to fail and learn, if necessary. I researched several recipes and read all the notes I could find. I decided to go light on the flour and use walnut oil rather than olive oil (you could also use standard vegetable oil, but I had walnut oil leftover from another project and I highly recommend it). We didn't have normal brandy so I winged it with a bit of slivovitz (multicultural cookies, you guys!).

melomakarona success
{melomakarona success}

They are perfect. I am over the moon. And I'm putting my notes and directions here, in all their tedious long winded glory, because I want to be able to replicate this year after year.

melomakarona
{melomakarona}

Melomakarona (makes about 4 dozen, recipe pulled from several sources + my own memories and preferences, but mostly from here)

For the cookies: 
1 cup walnut oil (highly recommended, although regular vegetable oil will be fine - only use olive oil if you have a really good source)
1/2 cup granulated sugar

3 cups all-purpose flour
1 teaspoon baking powder
1 teaspoon ground cinnamon
3/4 teaspoon ground cloves

1/2 teaspoon baking soda
1/2 cup fresh orange juice
Grated zest of 1 orange (and I also used zest from 1/2 lemon)
1/4 cup brandy

1 cup finely chopped walnuts

For the syrup:
1 cup granulated sugar
1 cup honey
1/2 cup water

Dash of cinnamon (or a cinnamon stick, if you have one lying around, which I never do)
A few strips each of lemon and orange zest (just use a sharp paring knife and try to get as little white as possible)

For the finishing touch: 
1 1/2 cups very finely chopped walnuts, practically ground (you can finely chop them, like I did, but next time I'll be getting out the food processor because it took forever!)

Directions: 
:: Preheat your oven to 325F.

:: In a large bowl (I used a mixer, but you don't really need to), start to beat the oil and sugar.

:: Meanwhile, whisk (or sift) the flour, baking powder, cinnamon, and cloves together in a bowl and set aside.

:: Combine the orange juice, orange zest, brandy and baking soda. It will foam a bit! Add this mixture to the oil and sugar and mix until well combined.

:: Add the chopped walnuts, followed by the flour mixture. Mix until your dough pulls away from the sides of the bowl and easily forms into a ball (this doesn't take very long, actually).

:: Have a couple of baking sheets handy, either oiled or lined with parchment paper or Silpat. Form the cookies by breaking off pieces of dough the size of an unshelled walnut and roll them between your palms to create small mounded oblongs. Place about an inch apart on the baking sheets and bake until the bottoms are lightly browned (about 20 minutes, but start checking at 15).

:: While the cookies bake, make your syrup. Combine the sugar, honey and water in a saucepan and bring to a boil. Reduce the heat, add the zest and cinnamon and simmer for about 10 minutes before turning off the heat.

:: As the cookies come out of the oven, submerge them in the syrup in small batches for a few minutes on each side. Remove them with a slotted spoon and allow them to drain briefly on a cooling rack before dipping them in the ground walnuts.


Notes (in case I've forgotten this by next year) -

Most recipes describe the dough as "stiff", but I think that's a bit misleading. The dough should be cohesive, pulling away from the sides of the bowl, readily willing to be shaped, not at all sticky. But it is still very soft and pliable. It will look greasy - don't panic! The baked cookies are not greasy in the least.

The dough should be formed into balls that are "the size of an unshelled walnut" (this comes from multiple recipes sources, so I guess it's standard). I have trouble estimating size, so I used a cookie scoop and then cut each scoop in half before rolling. They are a little bit smaller than bakery melomakarona, but not by much. The cookies will swell in the oven, so don't make them too large.

You should bake the cookies until the bottoms are pale golden brown. Mine were just about spot on at 18 minutes in the 325 oven.

You can experiment with the soaking time, but I found that 3 minutes for each side was just about perfect. This is assuming your syrup and cookies are still warm, if not piping hot. As they cool, you'll need more soaking time. If they are boiling hot, you can get away with 2 minutes on each side. You want the cookies nicely soaked but not to the point of mushy-ness. There should still be a good texture.

PUT A PIECE OF WAX PAPER UNDER THE COOLING RACK. Cleaning up the honey-sugar-walnut mixture from our counters wasn't that fun.

Friday, December 16, 2011

Getting in the spirit

pre-christmas prep
{pre-christmas prep}

This is what our apartment looked like at this time last year. We are so not there right now. I'm hoping we'll get a little closer this weekend. I'm resolving to get our tree up, to get that tablecloth out, to stock up on baking supplies and pull out some recipes.

I want to make melomakarona this year, my favorite Christmas cookie that always seems to get passed over because I run out of time. This recipe looks like it might be promising.

I want to candy orange peels and make caramel and bake more gingerbread. I want to sew a few little things and wrap a few other things and spend some time drinking my holiday tea and reading.

But I'll be happy if we put out the tree and sit still for an hour or two. And I can always buy melomakarona (LA people - Papa Christos usually has them). So there's that.

I'm making pies this weekend. Lots of pies. Stay tuned.

Thursday, November 17, 2011

Wedding, the dessert buffet!

On to happier food topics!

We decided on our cakes months before the wedding. Vanilla Bake Shop is our favorite LA bakery (I'm sure I just managed to offend 90% of my LA readers - bakeries are a divisive topic) and their custom wedding cakes are gorgeous, but way out of our price range ($800 minimum!). Their standard cakes are amazing and we figured out that 6 cakes (two 12" wide and four 9" wide) would easily serve our 140ish guests. They did.

We settled on flavors, I measured all my cake stands (this forced me to take inventory and it was embarrassing - let's just say what you see here is less than half of what I own) and picked out 6 that would work well together and then we did nothing until the week before the wedding, when we ordered the cakes. It came out to $420 total.

To fill it out (and because D is very much a cookie person rather than a cake person) I made 4 batches each of 4 different types of cookies, plus brownies, and spent about $80 on ingredients. I knocked out the dough in a few hours (I have a KitchenAid and an affinity for speedy assembly line baking). Baking the actual cookies sucked a bit, because it was so dang hot the week before the wedding. In light of our food disaster, I was so, so grateful that I didn't blow off the cookies, as tempting as it was at the time.

I knew that I could trust our wedding planners to set up our dessert buffet, but I was secretly hoping I'd find time to do it myself. You guys know how I feel about cake stands. While our friends hung our streamers on Saturday morning, I arranged the table, leaving notes so that it would be clear which cakes and cookies were going where. It was totally OCD. I loved it.

And of course, Michelle and Anna executed it perfectly. Michelle picked up the cakes for me (which eliminated a big logistical hurdle!) and drove them to the venue and then put everything out. I slipped out to see the final product just as guests were starting to arrive and nearly cried. I mean, the cookies were arranged in swirls. It was a work of art.

dessert buffet
{dessert buffet - photos by melissa of happy confetti photography}

It didn't last for very long, of course. In lieu of appetizers, lots of guests decided to start on cookies prior to dinner, and I could only applaud their wise decision. I would have joined in, eagerly, had I not been sequestered in the bridal suite.

We bought bakery boxes so that people could take home leftovers and it was a great move. There is always cake left at weddings and it kills me to see it get thrown away. We offered up the boxes at the end of the night and there was barely a scrap leftover. We smuggled out a couple bags of cookies and a piece of cake for our honeymoon.

For desserts, we spent $420 on cake + $80 on cookie ingredients + $30 on bakery boxes (I bought 80 boxes and we could have gone with 40 and it would have been fine - it seemed to be about one box per family and not everyone took anything home) + $40 on vintage cake servers + $15 on industrial cake knives. That was calculated to feed 150 people and it was more than enough.

It got a little chaotic after we cut the cake. Having six different cakes is a little tricky. In retrospect, I should have picked out one person to cut and serve each cake and then had an empty table nearby for the cut slices to go on. This would have made it much smoother. Heads up to anyone planning a dessert buffet sans caterer. I finally get the cupcakes at weddings craze.

And I know it is so cliche, but the only taste of cake I got that night was the ceremonial photo op bite. Sad.

cake cutting
{cake cutting - photo by melissa of happy confetti photography}

Right after I typed that I realized that it isn't true. I did get to eat some of the leftovers back in our hotel room at 3 am with my bare hands, and was joined enthusiastically by several of our friends. So that works too. Just make sure you get someone to package something for you. And maybe remember to include forks.

And because I'm still obsessed with our cake topper ...

cake topper
{by day - photo by melissa of happy confetti photography}

cake topper at night
{by night - photo by melissa of happy confetti photography}

It lives on our bookshelf currently, and I think it's probably the one piece of the wedding decor that we'll keep forever.

Thursday, August 5, 2010

Cookies to go

I discovered* the magic of freezing cookies and cookie dough while working on my sister's wedding and now it's my standard method. It's perfect for people like us because we never keep anything sweet in the house and we're fine with that, but it makes impromptu entertaining a little tough. I feel oddly compelled to provide some sort of dessert when we have guests.

We had people over a couple weeks ago and we wanted chocolate chip cookies. I made a double batch of dough, scooped it out onto a couple of baking sheets and stuck them in the freezer for a few hours. Once the dough is frozen, you can transfer all the cookies to an airtight container and just store them in the freezer until the next time you want them. No need to defrost - they'll only need a minute or two of extra baking time.

cookie dough balls
{cookie dough balls}

The advantage to this method is that you can bake just as many cookies as you need - no trying to pawn the extras off on your dieting coworkers. The disadvantage is that frozen balls of cookie dough are insanely delicious, so it can be tough not to pop one every time you walk through the kitchen. I store them in the most inconvenient place possible, forcing us to dig through piles of frozen stuff to get to them. It helps, a little. Consider yourself warned.

cookie dough ball
{cookie dough ball}

This method works perfectly with most cut out cookie recipes as well. As far as longevity goes, I've stored dough up to 2 months in the freezer and it's been fine. We've never managed to make it last any longer than that.

*Discovered is the key word here - not invented. Freezing baked goods or dough is pretty common, but I had never thought of doing it until I was faced with the logistical difficulty of making hundreds and hundreds of cookies.

Thursday, February 12, 2009

Linzer hearts

These cookies are my Valentine's day tradition. They are very delicate, just a tiny bit sweet, and kind of adorable.

butter + flowers
The fresher your butter, the better these will taste, so it's worth indulging in a good brand

Linzer Hearts
(from The Book of Afternoon Tea, makes 20)

1/2 cup butter
1/4 cup sugar
1 egg, lightly beaten
1/4 teaspoon almond extract (I used vanilla)
1 3/4 cups flour
3 tablespoons cornstarch
1/2 teaspoon baking powder

Jam of your choice for the filling

Superfine sugar for dusting (optional)

1. Beat butter and sugar until creamy. Add egg and extract.

2. Sift together dry ingredients and stir into the butter mixture until a soft dough forms. (This will be fairly dry and also not very sweet - don't worry about it!). Cover with plastic wrap and refrigerate briefly before rolling out.

3. Cut out 20 large hearts (assuming you use a cookie cutter that is approximately 2 inches across) and then cut a smaller heart inside each one. Knead and re-roll the dough and cut out more large hearts, making a total of 20 whole and 20 with the centers cut out.

4. Bake at 350 degrees for 10 - 12 minutes until the edges are just barely brown. Dip the hearts with the cut out centers in the superfine sugar. Spread the whole hearts with jam and then top each one with a cut out cookie.

linzer hearts + jam
They are much more colorful and cute in real life

*My beloved D40 is in Dubai with D, so I dusted off my first camera infatuation, SX 70. Sadly, the local camera store doubled the price of film when Polaroid announced it would be discontinuing the line. $20 for 10 exposures is a painful shock to someone who is happy to take 10 shots just to get a single usable one, but I'm still having fun with it.

Tuesday, August 12, 2008

Chocolate blizzard cookies

I really have no idea why these are chocolate blizzard cookies ... I guess because they still have a little bit of flour on the outside edges? It doesn't really constitute a blizzard, at least in my mind. But I do love them. I came across the recipe when I was doing an all out internet search for freezable cookies. I love cookies I can make ahead of time and then just bake or defrost.

DSC_0036

These are so good that I always make a double batch of dough and then freeze it in logs, as directed. We often have at least one log in the freezer, absolutely perfect for when people come over unexpectedly and I want to have dessert. You just slice them and bake them. The key is not overbaking them. They'll still seem a little gooey on the bottom when they come out of the oven, but they set up as they cool. The recipe calls for pecans, but I've always used walnuts. You can also leave the nuts out altogether, and the cookie doesn't suffer.

Here is the doubled recipe (original linked above, from recipelink.com), for those who don't like math, but do like cookies:

2 pounds bittersweet or semisweet chocolate, chopped (I use chocolate chips)
1/2 cup unsalted butter
1 cup all purpose flour
1 tsp. baking powder
1/2 tsp. salt
8 eggs
1 1/2 cup brown sugar
1 1/2 cup granulated sugar
20 oz. white chocolate, chopped
4 cups chopped walnuts (optional)

1. Melt the chocolate and butter over hot water. You don't have to have a double boiler. I just take one of my aluminum mixing bowls and rest it over a pot with boiling water in it and it works well enough.

2. Sift together the flour, baking powder and salt. Reserve.

3. Beat the eggs with the sugars until light and stir in the melted chocolate. Add the flour mixture, chopped white chocolate and nuts. Refrigerate the dough for at least a couple hours (it will be way too sticky until it cools down).

4. Shape the dough into rolls, like refrigerator cookies. This is the tricky part. Keep your hands well floured and don't worry too much about the mess. You'll have to experiment to see how thick you want the logs to be. I prefer them to be fairly small, because the cookies have such a rich flavor, so I usually make logs with a diameter of about 1 1/2 to 2 inches. Wrap with saran wrap, and then wrap with aluminum foil and put in a ziploc freezer bag if you plan to store them for more than a few days. Wrapped up well, they will last for at least 2 months in the freezer (probably longer, but they usually get eaten quickly). Let them sit in the freezer for at least a day before you try to cut them - it works better if they are really frozen solid.

5. Preheat the oven to 350 degrees F/180 degrees C. Line cookie sheets with parchment paper (or your Silpat!). Slice the cookies 1/2 inch thick. Bake only 10 to 12 minutes or just until they lose their sheen. They should just barely hold their shape when cool, and should be moist and chewy inside. Gently lift the cookies off the cookie sheets and cool on racks. Eat the ones that inevitably fall apart when you try to move them, because they are really good fresh from the oven.

Add these cookies to your list of things to try. Seriously.

Friday, July 25, 2008

Baking frenzy

Last night was a total baking extravaganza. My girlfriend came over right after work and we didn't stop until 10:30 pm. Being a total OCD freak about my kitchen space, I was a little nervous about having a baking buddy, but luckily Stace and I share some similar compulsions. Namely, cleaning up as you go and working quickly without being sloppy. The kitchen never turned into a disaster, but we managed to make several double batches of cookies (at one point, we both had our cookie guns out, pumping away and it was pretty priceless - I wish I had a picture of that).

I made a batch of caramel cream cookies, which I'm actually pretty blah about, but most people absolutely love them. I think it's the thick layer of buttercream in the middle. They're also pretty simple and they freeze really well if you need to make them ahead of time. I usually roll the dough out and then cut it into tiny circles, but I was short on time so I just jammed the dough into the cookie press and popped out some little clover shapes. They aren't quite as elegant, but it was a whole lot faster and they still look okay. I added some of my Mexican caramel to the buttercream, because the buttercream doesn't take on much caramel flavor on its own, despite browning the butter first.

DSC_0554

Here are the cookies getting ready to be sandwiched. Normally they would be round, but I think the cookie press clover shape isn't too bad. And yes, they are sitting on non-stick matting. Until I moved in with Dustin I didn't even know about non-stick matting, and now I'm OBSESSED. We lined all the kitchen drawers with it because it keeps the drawer inserts and the knives from sliding around. And then a little while ago I realized that putting it under cookies while you are piping on them is awesome, because the cookies don't slide around and make your life difficult.

I have approximately 12 million things to do today, including making a ton more cookies and designing fancy labels for all the food and packaging the favors (because I am crazy and I love cute labels even when they are totally unnecessary). I'm taking a short day at work to give myself a head start. I'll be back on Monday with a full shower re-cap and probably lots more cookie recipes. Don't worry - I swear I'll sometimes feature things other than cookies on here. I'm just stuck in a cookie place right now.

Thursday, July 24, 2008

Sugar therapy

I seriously feel like a new person today - a bone tired, absolutely exhausted person who would love to sleep for three days straight, but a new person nonetheless. Yesterday I felt bad for every person who walked into my office because I'm pretty sure I was terrifying in my crankiness.

I got home from work and was pretty cheered up to find my sugar cookie dough patiently waiting for me in the fridge. That stuff is tasty. I had to eat it for a while to make sure that it was high enough quality to be used for cookies.
DSC_0549
I use the Martha Stewart sugar cookie recipe and every single time I swear that I won't do it again, because it is a serious pain in the ass. It is the softest dough ever, so you are constantly having to stick it back in the fridge to chill, and once you cut the cookies you have to stick them in the fridge to chill before you can bake them, and it just generally annoys me. But once the first tray is taken out of the oven I always go back on my word. I'm not a huge sugar cookie fan, but these are pretty good. Crisp when they first come out, and then they soften up a bit, and they have great flavor for something that is basically butter and sugar.

These babies are going to be the favors for the bridal shower on Saturday, which is princess themed, so I thought it appropriate to make some tiaras. I have glass slippers too, but no pics yet. I'm going to frost them tonight, so hopefully they turn out appropriately cutesy.
DSC_0551

Wednesday, July 9, 2008

Big Fat Chewy Chocolate Chip Cookies


Best chocolate chip cookies ever...seriously. I used to have the worst time making this classic because I prefer a doughy cookie over a flat sugary cookie. These are perfect, and they work every time. Recipe via Milk Eggs Chocolate, via Smitten Kitchen, via AllRecipes.com. I guess these have made the rounds, which is understandable, because they are perfect. I add a bit of orange zest, because I love the contrast with the semi sweet chocolate. I also don't melt the butter, I just cream it while it is room temp and then add the sugars. And I let the dough chill in the fridge for an hour or so before I start any baking - it seems to help them firm up a bit. I have to admit that I may have overdosed on these. Three batches in two weeks will do that to you. Don't say I didn't warn you.